
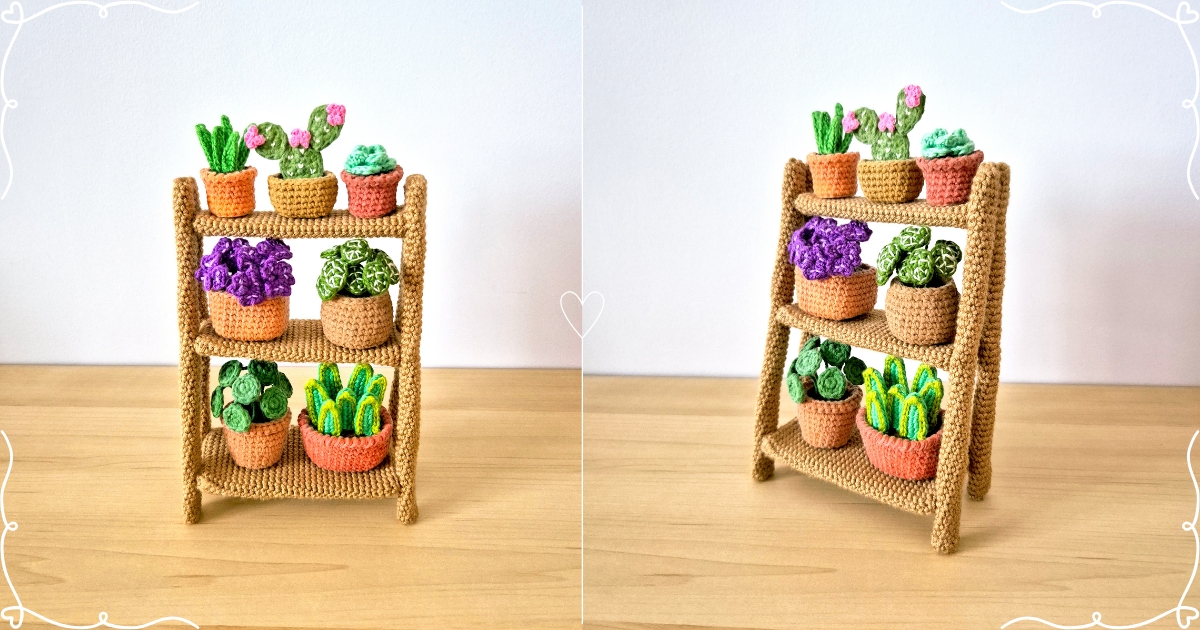
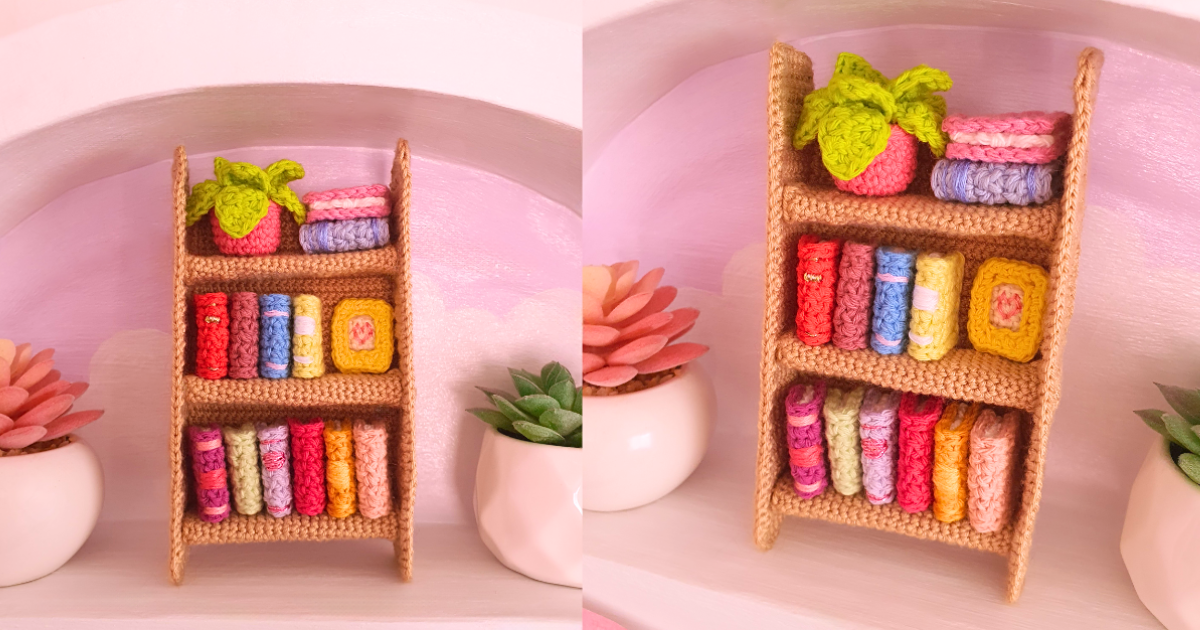
After finishing my bookshelf pattern, making a crochet plant shelf pattern felt like the most logical next step. I already had the tiny shelf obsession going, so obviously it needed plants next. The problem? That meant I actually had to crochet the plants… and for some mysterious reason, I really don’t enjoy making crochet plants.
I’m not even completely sure why. Maybe it’s because they take forever, there are approximately eight million ends to weave in, and every tiny leaf comes with another tiny detail that needs to be added. But I think the main reason is that crochet houseplants don’t leave me quite as much creative freedom as some of my other projects. When I decide to make a Pilea, a Fittonia or a purple shamrock, I want it to actually look like one. And trying to reproduce a real plant faithfully in miniature crochet form is… humbling. Very humbling.
Everything becomes disproportionately large the second you shrink it down. A leaf that looks perfectly normal on your hook suddenly looks like it belongs to a tropical plant from the Jurassic period once you put it in the tiny pot. And because I am unfortunately a perfectionist, when I already know I probably won’t be able to make something look exactly the way I pictured it in my head, my favorite solution is to avoid doing it altogether.
So this pattern took me weeks to finish. Honestly, probably closer to two months. I kept finding very important side projects that absolutely had to be done right that second whenever it was time to go back to the plants. But over the last few days, I finally decided enough was enough and worked on it properly because I really wanted to release this pattern, and, more importantly, I wanted to finally see the finished little plant shelf sitting on my desk.
And now that it’s done, I’m very glad I stopped procrastinating because I love the result. I’ve always wanted a real plant shelf, but I also live with cats. Some of the plants I love are toxic to them, and the non-toxic ones would probably have an equally tragic fate because my cats are enthusiastic plant murderers. Nothing leafy is safe. So a shelf full of crochet plants is the safest compromise for everyone involved.
No poisonous leaves, no mysteriously overturned pots, no half-eaten plants waiting for me in the morning: just my tiny crochet plant collection sitting peacefully on its shelf, completely beyond the reach of feline horticultural destruction. And after spending two months avoiding making it, I have to admit… it was worth it. Now grab you hook and let’s crochet this together, shall we?!

Materials
Abbreviations
ch: chain
sl st: slip stitch
sc: single crochet
hdc: half double crochet
dc: double crochet
inc: increase
dec: decrease
BLO: back loops only
FLO: front loops only
sc3tog: a decrease of 3 single crochet together
R: round / row
Notes – Crochet Plant Shelf Pattern
The finished crochet plant shelf pattern measures approximately 15 cm high × 10,8 cm wide × 5 cm deep.
Gauge for the shelf: 16 sc x 16 rows = 5 x 5 cm.
Gauge for the crochet plants: 18 sc x 17 rows = 5 x 5 cm.
You can use embroidery floss (all 6 strands) to make the plants, as the thickness is just right for them.
For the shelf planks, try to keep the seam where the rounds are joined as straight as possible. If your seam shifts slightly, adjust the last round so that the sc3tog decreases still fall at the very ends of the shelf on both sides.
Need help keeping track of your rows?
Try Froggit, my free crochet row counter you can use directly in your browser. It helps you track your rows, rounds, and project time while you crochet or knit; no download or account needed.
Try the Free Crochet Row CounterCrochet Plant Shelf Pattern
The Shelf
Bottom Shelf Panel
Ch17, starting the second loop from the hook:
Round 1: 15 sc, (3 sc in the last loop of the chain), continue working on the other side of the chain base: 14 sc, (2 sc in the final loop – the same loop you worked into at the beginning) (34)
Round 2: 34 BLO sc (34)
R3 to 33: 34 sc (34)
R34: skip the first stitch (the same stitch where you made the sl st to join the round), then: 14 sc, sc3tog, 14 sc, sc3tog (work the final leg of the last sc3tog into the skipped stitch) (30)
Cut the yarn, leaving a long tail for sewing. Cut a piece of plastic canvas that fits nicely inside the shelf panel (mine measured about 8,5 × 4,4 cm and was 1 mm thick), then slide it inside. Line up the stitches on both sides of the opening and sew each pair together through the front loops only to close the panel.

Middle Shelf Panel
Ch13, starting the second loop from the hook:
Round 1: 11 sc, (3 sc in the last loop of the chain), continue working on the other side of the chain base: 10 sc, (2 sc in the final loop – the same loop you worked into at the beginning) (26)
Round 2: 26 BLO sc (26)
R3 to 33: 26 sc (26)
R34: skip the first stitch (the same stitch where you made the sl st to join the round), then: 10 sc, sc3tog, 10 sc, sc3tog (work the final leg of the last sc3tog into the skipped stitch) (22)
Cut the yarn, leaving a long tail for sewing. Cut a piece of plastic canvas that fits nicely inside the shelf panel (mine measured about 8,5 × 3,4 cm and was 1 mm thick), then slide it inside. Line up the stitches on both sides of the opening and sew each pair together through the front loops only to close the panel.

Top Shelf Panel
Ch8, starting the second loop from the hook:
Round 1: 6 sc, (3 sc in the last loop of the chain), continue working on the other side of the chain base: 5 sc, (2 sc in the final loop – the same loop you worked into at the beginning) (16)
Round 2: 16 BLO sc (16)
R3 to 33: 16 sc (16)
R34: skip the first stitch (the same stitch where you made the sl st to join the round), then: 5 sc, sc3tog, 5 sc, sc3tog (work the final leg of the last sc3tog into the skipped stitch) (12)
Cut the yarn, leaving a long tail for sewing. Cut a piece of plastic canvas that fits nicely inside the shelf panel (mine measured about 8,5 × 1,8 cm and was 1 mm thick), then slide it inside. Line up the stitches on both sides of the opening and sew each pair together through the front loops only to close the panel.


Front Support Posts – Make 2
Ch3, starting the second loop from the hook:
Round 1: 1 sc, (4 sc in the last loop of the chain), continue working on the other side of the chain base: (3 sc in the last loop – the same loop you worked into at the beginning) (8)
Round 2 to 50: 8 sc (8)
Cut the yarn, leaving a long tail for sewing. Cut a piece of craft wire to fit inside the support post, then slide it in. Using a yarn needle and the remaining yarn tail, sew the top opening closed. The front post should measure approximately 16,5 cm (6,5 inches) tall. Make two of them.


Back Support Posts – Make 2
Ch3, starting the second loop from the hook:
Round 1: 1 sc, (4 sc in the last loop of the chain), continue working on the other side of the chain base: (3 sc in the last loop – the same loop you worked into at the beginning) (8)
Round 2 to 49: 8 sc (8)
Cut the yarn, leaving a long tail for sewing. Cut a piece of craft wire to fit inside the support post, then slide it in. Using a yarn needle and the remaining yarn tail, sew the top opening closed. The back post should measure approximately 16 cm (6,3 inches) tall. Make two of them.

Assembling the Crochet Plant Shelf Pattern
You should now have three shelf panels, two front support posts, and two back support posts.


Your Crochet Plant Shelf Pattern structure is now ready for its little crochet houseplants!
Crochet Houseplants Pattern
Work this whole section with the 2 mm crochet hook.
Crochet Plant Pattern 1
Flower Pot
Make a magic circle. End each round with a sl st into the first stitch of the round.
Round 1: 6 sc (6)
R2: sc inc x 6 (12)
R3: (1 sc, sc inc) x 6 (18)
R4: (2 sc, sc inc) x 6 (24)
R5: BLO: (3 sc, sc inc) x 6 (30)
R6 to 11: 30 sc (30)
R12: (3 sc, sc dec) x 6 (24)
R13: 24 sl st (24)
Cut the yarn and weave in the ends.
Soil – Crochet Plant Shelf Pattern
Make a magic circle. End each round with a sl st into the first stitch of the round.
Round 1: 6 sc (6)
R2: sc inc x 6 (12)
R3: (1 sc, sc inc) x 6 (18)
R4: (2 sc, sc inc) x 6 (24)
Cut the yarn and leave a long tail for sewing. Fill the inside of the flower pot with polyester fiberfill. Place the soil piece on top of the stuffing, positioning it level with Round 12. Sew the soil inside the pot, making sure to hide the stitches so that no thread is visible on the outside. You can use invisible thread if you find it easier.
Fittonia Crochet Pattern
Ch 4, starting the second loop from the hook (work the round around a 4,5 cm long piece of craft wire) :
Round 1: (1 sc, 1 hdc), (1 dc, 1 hdc), (1 sc, ch1, 1 sc), (1 hdc, 1 dc), (1 hdc, 1 sc)
Cut the yarn and leave a long tail. Wrap the yarn tail around the remaining exposed craft wire, leaving enough wire uncovered at the end so the leaf can be inserted deep enough into the soil to hold firmly in place.
Using ecru embroidery floss (2 strands), embroider the vein details onto the crochet Fittonia leaves.
Make 8 leaves this way, then insert them into the soil and arrange them however you like.


Crochet Plant Pattern 2
Flower Pot
Make a magic circle. End each round with a sl st into the first stitch of the round.
Round 1: 4 sc (4)
R2: (3 sc in the same stitch) x 4 (12)
R3: 1 sc, (3 sc in the next stitch), 2 sc, (3 sc in the next stitch), 2 sc, (3 sc in the next stitch), 2 sc, (3 sc in the next stitch), 1 sc (20)
R4: 2 sc, (3 sc in the next stitch), 4 sc, (3 sc in the next stitch), 4 sc, (3 sc in the next stitch), 4 sc, (3 sc in the next stitch), 2 sc (28)
R4: 3 sc, (3 sc in the next stitch), 6 sc, (3 sc in the next stitch), 6 sc, (3 sc in the next stitch), 6 sc, (3 sc in the next stitch), 3 sc (36)
R5 to 11: 36 sc (36)
Cut the yarn and weave in the ends.
Soil
Make a magic circle. End each round with a sl st into the first stitch of the round.
Round 1: 4 sc (4)
R2: (3 sc in the same stitch) x 4 (12)
R3: 1 sc, (3 sc in the next stitch), 2 sc, (3 sc in the next stitch), 2 sc, (3 sc in the next stitch), 2 sc, (3 sc in the next stitch), 1 sc (20)
R4: 2 sc, (3 sc in the next stitch), 4 sc, (3 sc in the next stitch), 4 sc, (3 sc in the next stitch), 4 sc, (3 sc in the next stitch), 2 sc (28)
R4: 3 sc, (3 sc in the next stitch), 6 sc, (3 sc in the next stitch), 6 sc, (3 sc in the next stitch), 6 sc, (3 sc in the next stitch), 3 sc (36)
Cut the yarn and leave a long tail for sewing. Fill the inside of the flower pot with polyester fiberfill. Place the soil piece on top of the stuffing, positioning it level between round 10 and round 11. Sew the soil inside the pot, making sure to hide the stitches so that no thread is visible on the outside.
Purple Shamrock Crochet Pattern
Make a magic circle (work the round around a 7 cm long piece of craft wire).
Round 1: (Ch3, 1 dc, 1 sc, 1 dc, ch3, 1 sl st) x 3
Cut the yarn, close the hole of the magic circle tight and leave a long tail. Wrap the yarn tail around the remaining exposed craft wire, leaving enough wire uncovered at the end so the leaf can be inserted deep enough into the soil to hold firmly in place.
Using light purple embroidery floss (3 strands), embroider the small V like shaped details in the center of each purple shamrock leaf.


Crochet Plant Pattern 3
Flower Pot
Make a magic circle. End each round with a sl st into the first stitch of the round.
Round 1: 6 sc (6)
R2: sc inc x 6 (12)
R3: (1 sc, sc inc) x 6 (18)
R4: BLO: (2 sc, sc inc) x 6 (24)
R5 to 6: 24 sc (24)
R7: (3 sc, sc inc) x 6 (30)
R8 to 11: 30 sc (30)
R12 to 13: FLO: 30 sc (30)
Cut the yarn and weave in the ends.
Soil – Crochet Plant Shelf Pattern
Make a magic circle. End each round with a sl st into the first stitch of the round.
Round 1: 6 sc (6)
R2: sc inc x 6 (12)
R3: (1 sc, sc inc) x 6 (18)
R4: (2 sc, sc inc) x 6 (24)
Cut the yarn and leave a long tail for sewing. Fill the inside of the flower pot with polyester fiberfill. Place the soil piece on top of the stuffing, positioning it level with round 6. Sew the soil inside the pot, making sure to hide the stitches so that no thread is visible on the outside.
Crochet Pilea Plant Pattern
First, cut a piece of craft wire approximately 9,5 cm long, put it aside for now. Then, make a magic circle with your yarn.
Round 1: 5 sc (5)
Round 2: for the second round, we will work around the craft wire: sc inc x 2, hdc inc, sc inc x 2 (10)
Cut the yarn and leave a long tail. Take the yarn tail and start wrapping it around the craft wire.
At this point, you can choose how long you want your leaf to be. You can make it large, medium, or small depending on the look you want for your plant. Just keep the height of the shelf in mind so the leaves are not too tall.
Leave a small part of the craft wire uncovered at the bottom, as this is the part that will be inserted into the soil.
Once you reach the leaf length you want, add a little glue to the yarn to keep it in place.
Make 7 leaves, or more if you want, in different sizes. Insert the uncovered ends of the craft wires into the soil to finish your plant. Any yarn tails that are still visible can be tucked into the soil so they don’t show.


Crochet Plant Pattern 4
Flower Pot
Ch 6, starting the second loop from the hook (end each round with a sl st into the first stitch of the round.) :
Round 1: 4 sc, (3 sc in the last loop of the chain), continue working on the other side of the foundation chain: 3 sc, (2 sc in the last loop – which is the same loop where you began the round) (12)
Round 2: sc inc, 3 sc, sc inc x 3, 3 sc, sc inc x 2 (18)
R3: 1 sc, sc inc, 3 sc, (1 sc, sc inc) x 3, 3 sc, (1 sc, sc inc) x 2 (24)
R4: 2 sc, sc inc, 3 sc, (2 sc, sc inc) x 3, 3 sc, (2 sc, sc inc) x 2 (30)
R5: BLO: 3 sc, sc inc, 3 sc, (3 sc, sc inc) x 3, 3 sc, (3 sc, sc inc) x 2 (36)
R6 to 11: 36 sc (36)
R12: Ch1, 36 reverse sc (36)
Cut the yarn and weave in the ends.
Soil – Crochet Plants Free Pattern
Ch 6, starting the second loop from the hook (end each round with a sl st into the first stitch of the round.) :
Round 1: 4 sc, (3 sc in the last loop of the chain), continue working on the other side of the foundation chain: 3 sc, (2 sc in the last loop – which is the same loop where you began the round) (12)
Round 2: sc inc, 3 sc, sc inc x 3, 3 sc, sc inc x 2 (18)
R3: 1 sc, sc inc, 3 sc, (1 sc, sc inc) x 3, 3 sc, (1 sc, sc inc) x 2 (24)
R4: 2 sc, sc inc, 3 sc, (2 sc, sc inc) x 3, 3 sc, (2 sc, sc inc) x 2 (30)
R5: 3 sc, sc inc, 3 sc, (3 sc, sc inc) x 3, 3 sc, (3 sc, sc inc) x 2 (36)
Cut the yarn and leave a long tail for sewing. Fill the inside of the flower pot with polyester fiberfill. Place the soil piece on top of the stuffing, positioning it level between round 11 and round 12. Sew the soil inside the pot, making sure to hide the stitches so that no thread is visible on the outside.
Snake Plant Crochet Pattern
Middle size leaf (make 2 of them):
Cut a piece of craft wire around 8 cm long. We will work the first row around the wire.
Fold the wire in half so it follows the shape of the top of the leaf. Make sure both ends of the wire extend past the bottom of the leaf, as they will be used later to insert the leaf into the soil.
With your first color: Ch 10. Starting in the second loop from the hook:
Row 1: 1 sc, 5 hdc, 2 sc, (1 sc, 1 dc, 1 sc) in the last loop of the foundation chan, continue working on the other side of the chain: 2 sc, 5 hdc, 1 sc. (19)
Row 2: change to color 2: 9 sl st, (sl st, ch1, sl st), 9 sl st. (20 st, 1 ch1)
Cut yarn and weave in the ends.
Big leaf (make 2 of them):
Cut a piece of craft wire around 9 cm long. We will work the first row around the wire.
Fold the wire in half so it follows the shape of the top of the leaf. Make sure both ends of the wire extend past the bottom of the leaf, as they will be used later to insert the leaf into the soil.
With your first color: Ch 11. Starting in the second loop from the hook:
Row 1: 2 sc, 5 hdc, 2 sc, (1 sc, 1 dc, 1 sc) in the last loop of the foundation chan, continue working on the other side of the chain: 2 sc, 5 hdc, 2 sc. (21)
Row 2: change to color 2: 10 sl st, (sl st, ch1, sl st), 10 sl st. (22 st, 1 ch1)
Cut yarn and weave in the ends.
Small leaf (make 3 of them):
Cut a piece of craft wire around 7 cm long. We will work the first row around the wire.
Fold the wire in half so it follows the shape of the top of the leaf. Make sure both ends of the wire extend past the bottom of the leaf, as they will be used later to insert the leaf into the soil.
With your first color: Ch 8. Starting in the second loop from the hook:
Row 1: 1 sc, 3 hdc, 2 sc, (1 sc, 1 dc, 1 sc) in the last loop of the foundation chan, continue working on the other side of the chain: 2 sc, 3 hdc, 1 sc. (15)
Row 2: change to color 2: 7 sl st, (sl st, ch1, sl st), 7 sl st. (16 st, 1 ch1)
Cut yarn and weave in the ends.
Arrange the leaves as you wish, or follow the placement shown in my example, by inserting the ends of the craft wires into the soil. You can either glue the leaves in place or sew them to the soil with invisible thread.


Crochet Plant Pattern 5
Flower Pot
Make a magic circle. End each round with a sl st into the first stitch of the round.
Round 1: 6 sc (6)
R2: sc inc x 6 (12)
R3: (1 sc, sc inc) x 6 (18)
R4: BLO: 18 sc (18)
R4 to 8: 18 sc (18)
R9: (sl st, ch1) repeat this around until the end of the round. End with an invisible stitch when you’re done.
Cut the yarn and weave in the ends.
Soil – Crochet Plant Shelf Pattern
Make a magic circle. End each round with a sl st into the first stitch of the round.
Round 1: 6 sc (6)
R2: sc inc x 6 (12)
R3: (1 sc, sc inc) x 6 (18)
Cut the yarn and leave a long tail for sewing. Fill the inside of the flower pot with polyester fiberfill. Place the soil piece on top of the stuffing, positioning it level with round 8. Sew the soil inside the pot, making sure to hide the stitches so that no thread is visible on the outside.
Crochet Aloe Vera Pattern
Leaf 1 (x2)
Ch 8, starting the second loop from the hook (work this row around a 4 cm long piece of craft wire. Make sure the bottom end of the wire extends past the bottom of the leaf, as this part will later be inserted into the soil to hold the leaf in place.):
Row 1: 4 hdc, 1 sc, 2 sl st (7)
Cut the yarn and weave in the ends.
Leaf 2 (x3)
Ch 11, starting the second loop from the hook (work this row around a 4 cm long piece of craft wire. Make sure the bottom end of the wire extends past the bottom of the leaf, as this part will later be inserted into the soil to hold the leaf in place.):
Row 1: 5 hdc, 3 sc, 2 sl st (10)
Cut the yarn and weave in the ends. Once you have made your 5 leaves, plant them into the soil.


Crochet Plant Pattern 6
Flower Pot
Ch 5, starting the second loop from the hook (end each round with a sl st into the first stitch of the round.) :
Round 1: 3 sc, (3 sc in the last loop of the chain), continue working on the other side of the foundation chain: 2 sc, (2 sc in the last loop – which is the same loop where you began the round) (10)
Round 2: (3 sc in the first stitch), 2 sc, (3 sc in the next stitch), 1 sc, (3 sc in the next stitch), 2 sc, (3 sc in the next stitch), 1 sc (18)
R3: BLO: 1 sc, (3 sc in the next stitch), 4 sc, (3 sc in the next stitch), 3 sc, (3 sc in the next stitch), 4 sc, (3 sc in the next stitch), 2 sc (26)
R4 to 8: 26 sc (26)
Cut the yarn and weave in the ends.
Soil – Crochet Plant Shelf Pattern
Ch 5, starting the second loop from the hook (end each round with a sl st into the first stitch of the round.) :
Round 1: 3 sc, (3 sc in the last loop of the chain), continue working on the other side of the foundation chain: 2 sc, (2 sc in the last loop – which is the same loop where you began the round) (10)
Round 2: (3 sc in the first stitch), 2 sc, (3 sc in the next stitch), 1 sc, (3 sc in the next stitch), 2 sc, (3 sc in the next stitch), 1 sc (18)
R3: 1 sc, (3 sc in the next stitch), 4 sc, (3 sc in the next stitch), 3 sc, (3 sc in the next stitch), 4 sc, (3 sc in the next stitch), 2 sc (26)
Cut the yarn and leave a long tail for sewing. Fill the inside of the flower pot with polyester fiberfill. Place the soil piece on top of the stuffing, positioning it level with round 7. Sew the soil inside the pot, making sure to hide the stitches so that no thread is visible on the outside.
Crochet Cactus Pattern
Base
Ch 5, starting the second loop from the hook (end each row with a ch1 then turn):
Row 1 to 2: 4 sc (4)
R3 to 4: sc dec x 2 (2)
R5: sc dec (1)
Cut the yarn and weave in the ends. Make a second one, but this time do not cut the yarn.
Place the two panels together, with the stitches aligned. Cut a 7 cm long piece of craft wire. We will work the edging around the wire, just like we did for the snake plant. Leave both ends of the wire sticking out on each side so they can be inserted into the soil later.
Now join the two panels by single crocheting around the edges. For each sc, insert your hook through the matching stitch of both panels at the same time, working around the craft wire, then complete the sc as usual. Continue this way around the edges:
Ch1, 1 sc, sc inc, 1 sc, (sc inc in the loop of the last sc from row 1), 2 sc, (sc inc in the loop of the first sc from row 1) 1 sc, sc inc, 1 sc, ch1, sc in the top stitch, cut yarn then make an invisible join. Weave in all ends.
Top Left
Ch 2, starting the second loop from the hook (end each row with a ch1 then turn):
Row 1: sc inc (2)
Row 2: sc inc, 1 sc (3)
R3: 3 sc (3)
R4: Sc3tog (1)
Cut the yarn and weave in the ends. Make a second one, but this time do not cut the yarn.
Place the two panels together, with the stitches aligned. We will now join them by single crocheting around the edges. For each sc, insert your hook through the matching stitch of both panels at the same time, then complete the sc as usual. Continue this way around the edges:
Ch1, 3 sc, ch1, 1 sc in the bottom stitch, ch1, 3 sc, ch1, 1 sc in the top stitch, cut yarn and make an invisible join. Weave in all ends.
Top Right
Ch 2, starting the second loop from the hook (end each row with a ch1 then turn):
Row 1: 1 sc (1)
Row 2: sc inc (2)
R3: 1 sc, sc inc (3)
R4: 3 sc (3)
R5: sc3tog (1)
Cut the yarn and weave in the ends. Make a second one, but this time do not cut the yarn.
Place the two panels together, with the stitches aligned. We will now join them by single crocheting around the edges. For each sc, insert your hook through the matching stitch of both panels at the same time, then complete the sc as usual. Continue this way around the edges:
Ch1, 5 sc, ch1, 1 sc in the bottom stitch, ch1, 5 sc, ch1, 1 sc in the top stitch, cut yarn and make an invisible join. Weave in all ends.
Now sew the top left and top right of the cactus to the top of the base. Using 3 strands of ecru (beige) embroidery floss, embroider small V-shaped stitches across the cactus to mimic the spines.
Using 3 strands of pink embroidery floss, make the flowers this way:
Make a magic circle
Round 1: (Ch1, 1 hdc, ch1, sl st) x 4 (= 4 petals)
Cut the yarn, make 3 flowers this way then sew or glue them to the cactus.


Crochet Plant Pattern 7
Flower Pot
Make a magic circle. End each round with a sl st into the first stitch of the round.
Round 1: 6 sc (6)
R2: sc inc x 6 (12)
R3: (1 sc, sc inc) x 6 (18)
R4: BLO: 18 sc (18)
R4 to 8: 18 sc (18)
R9: (sl st, ch1) repeat this around until the end of the round. End with an invisible stitch when you’re done.
Cut the yarn and weave in the ends
Soil – Crochet Plant Shelf Pattern
Make a magic circle. End each round with a sl st into the first stitch of the round.
Round 1: 6 sc (6)
R2: sc inc x 6 (12)
R3: (1 sc, sc inc) x 6 (18)
Cut the yarn and leave a long tail for sewing. Fill the inside of the flower pot with polyester fiberfill. Place the soil piece on top of the stuffing, positioning it level with round 8. Sew the soil inside the pot, making sure to hide the stitches so that no thread is visible on the outside.
Crochet Succulent Pattern
Ch 32, then starting the 3rd loop from the hook:
Row 1: (3 hdc in the first loop), 1 sl st, (1 hdc, 2 dc, 1 hdc) in the next loop, 1 sl st, (1 hdc, 2 dc, 1 hdc) in the next loop, 1 sl st, {(1 hdc, 1dc) in the next loop, (1 dc, 1 hdc) in the next loop, 1 sl st} repeat this x 4, {1 hdc, (3 dc in the next loop), 1 hdc, 1 sl st} repeat this x 3.
Cut the yarn and leave a long tail for sewing. Roll the crocheted piece up, starting with the beginning of the piece in the center, then wrap the rest around it to shape the succulent. Sew the leaves in place, then sew the finished succulent onto the soil.


To Finish The Crochet Plant Shelf Pattern
Now that your shelf and all the little plants are finished, all that’s left to do is arrange them on the shelves however you like. Place each plant where you think it looks best, and your crochet plant shelf is complete!


You can follow the placement shown in the photos, or create your own little plant display by mixing the different shapes, heights, and colors. There is no right or wrong way to arrange them, so have fun with this final step and make your crochet plant shelf your own.
And that’s it, your little crochet plant shelf is finished! I hope you had fun making all these tiny crochet plants and putting everything together. I really hope you love how your little shelf turned out!
If you make your own crochet plant shelf using this crochet plant pattern, I would love to see it! Feel free to share a photo of your finished project on social media (Instagram, Pinterest, Youtube, Tiktok) and tag me so I can see how you arranged all your little plants.
And if you enjoyed this pattern, don’t forget to check out my other crochet patterns for more little projects to make. There are plenty more waiting for you!
Thank you so much for making this pattern, and I hope to see you again for the next one!


















































I hope you can make a tutorial video about this on youtube😍