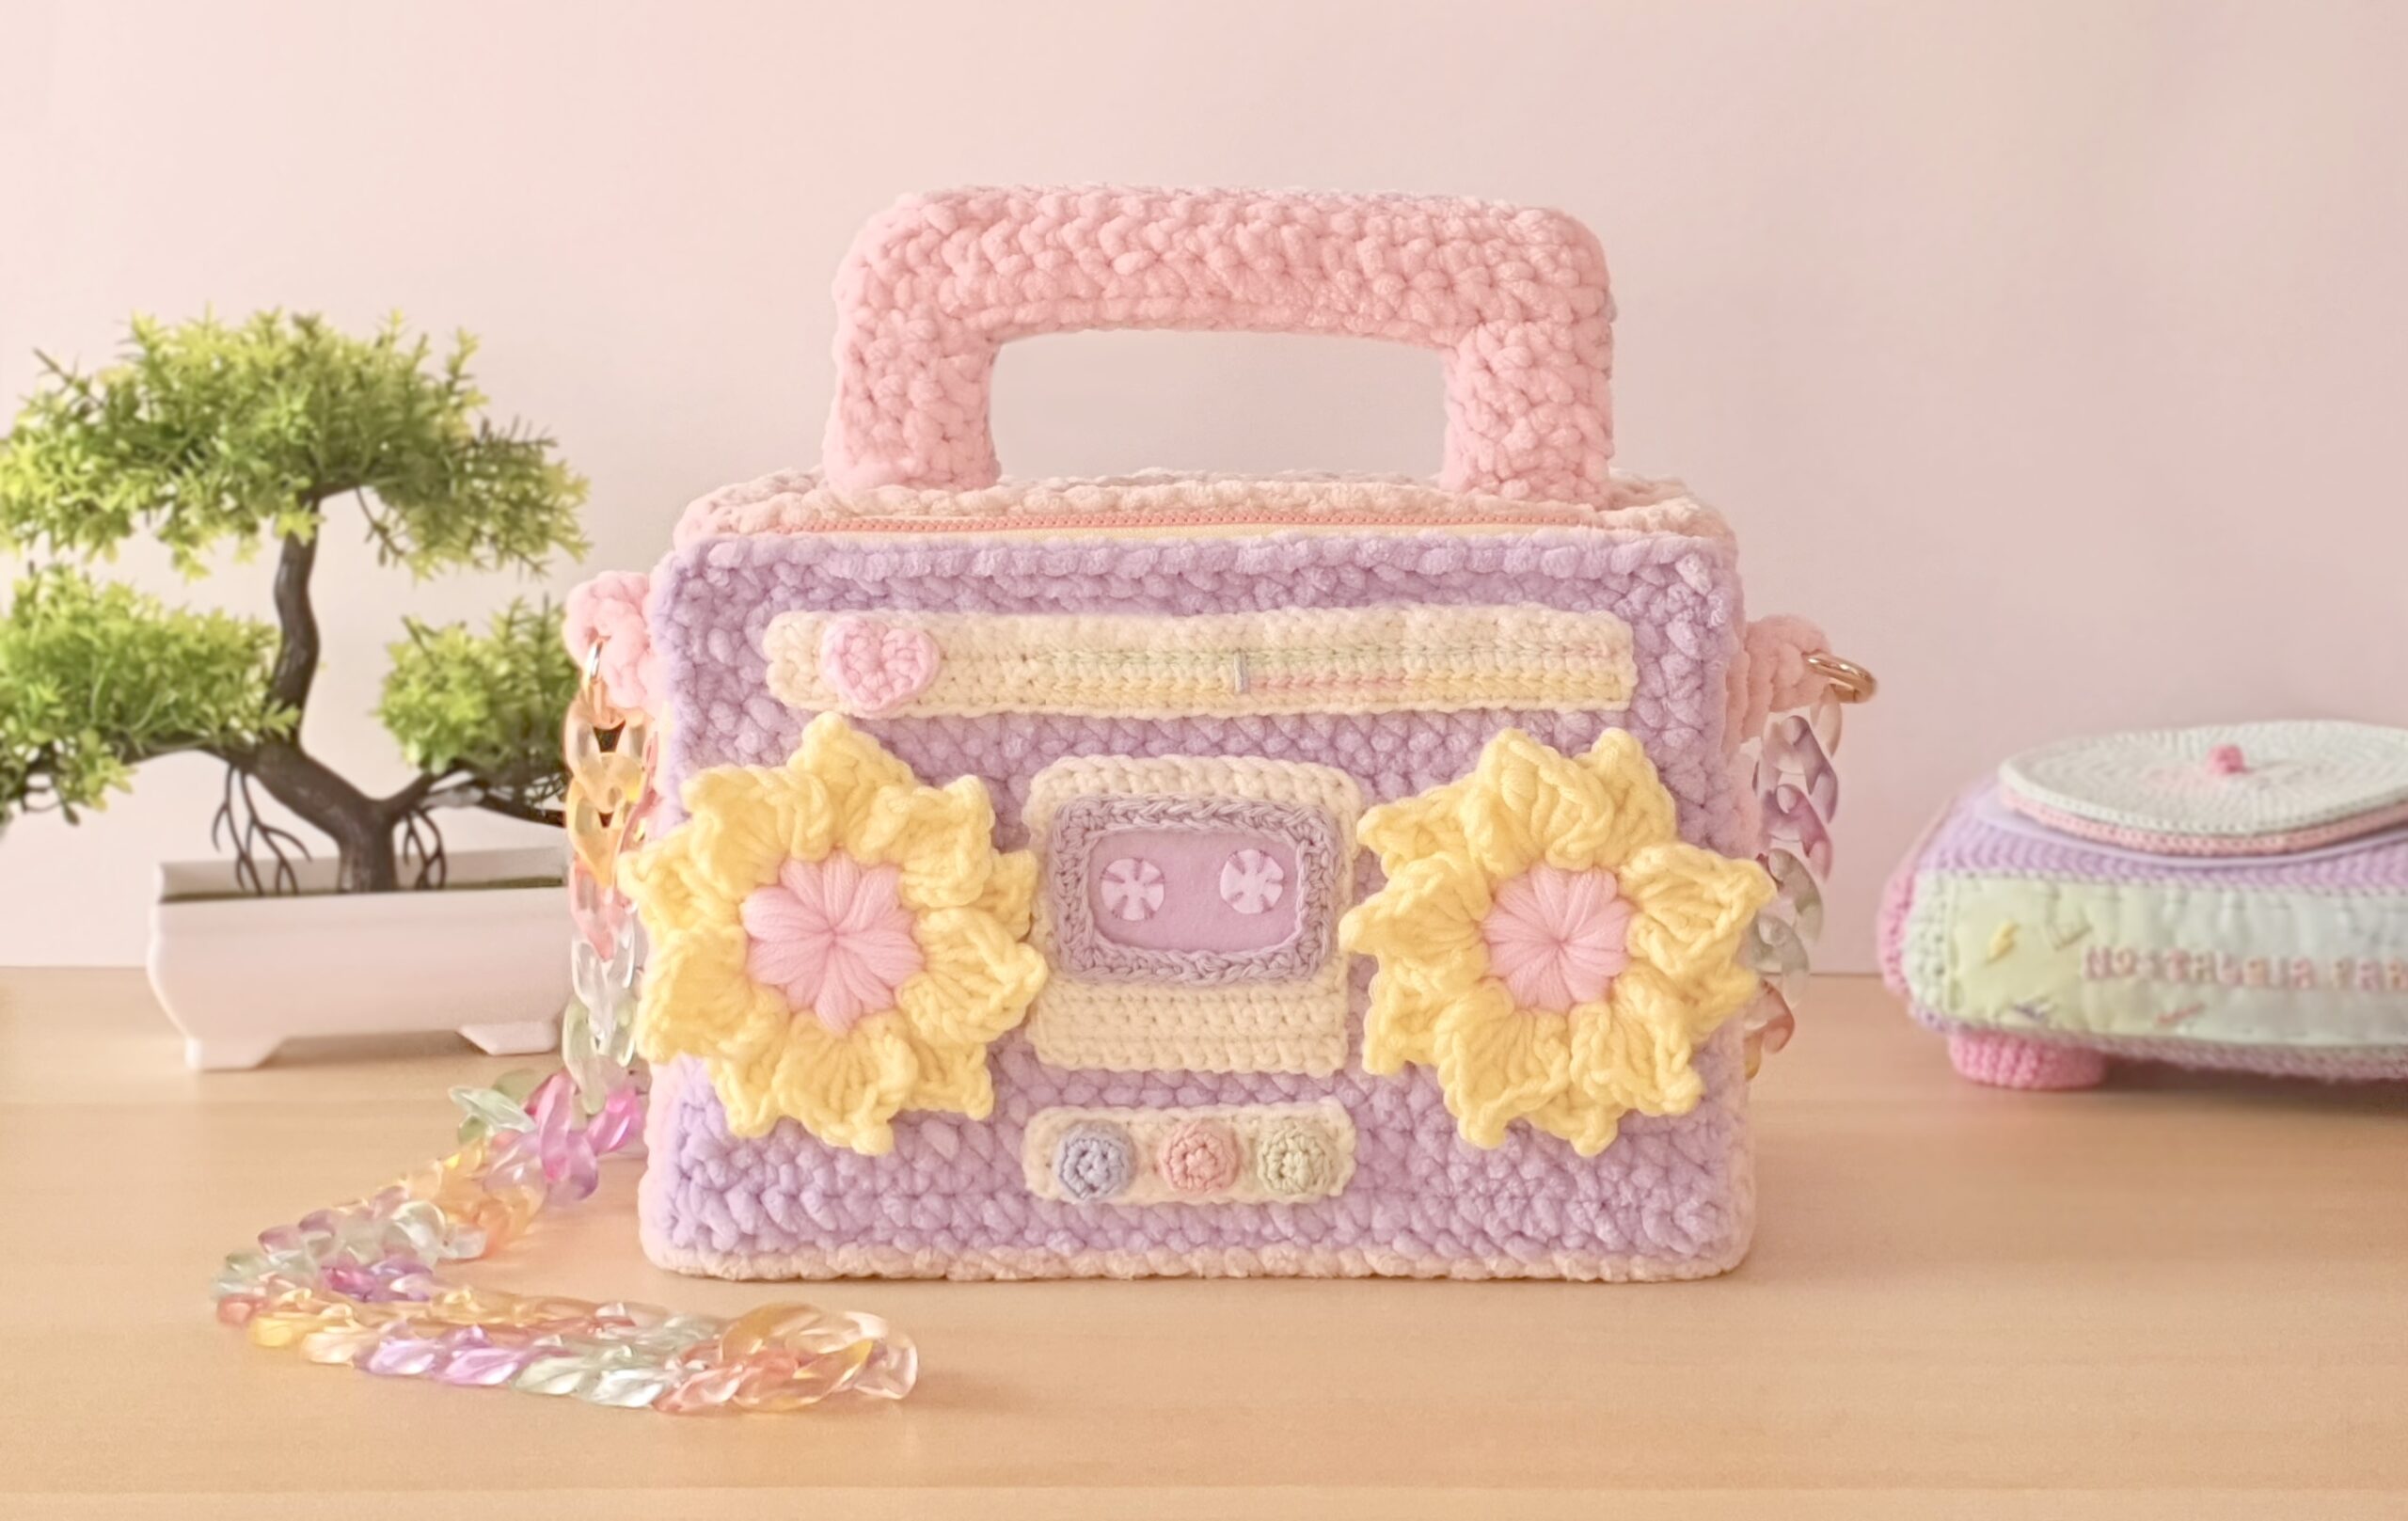
Welcome to the world of crochet nostalgia! Get ready to embark on a delightful journey through time as I introduce you to my captivating crochet pattern: the Boombox Bag. This unique design is a perfect fusion of vintage charm and modern creativity, meticulously crafted to bring back those cherished memories of the retro era. Whether you experienced the golden age of boomboxes firsthand or simply appreciate the timeless allure they possess, this pattern is sure to evoke a wave of sentimentality!
Material – Crochet Boombox Bag
- 3 different colors of velvet yarn for the bag: I personally picked light purple, pastel pink and honey.
- Yellow and pink acrylic worsted yarn for the sunflowers
- Cream white acrylic worsted yarn
- a 2,5 mm, a 3 mm, a 4,5 mm and a 6 mm crochet hooks
- Some DK cotton yarn of different colors for the details (pink, blue, green, purple)
- I used some colorful pearl cotton thread for the FM/AM bands
- Gold D-rings x 2
- Chain strap
- Plastic Canvas
- a 25 cm zipper
- Lining fabric
** The words highlighted in blue are direct links to products on Amazon.com. As an Amazon Associate, I earn from qualifying purchases. This means that when you click on links to various products on this site and make a purchase, this can result in a commission that is credited to this site. This helps support the maintenance and growth of Atelierdelilah.Com, at no additional cost to you. Thank you for your support! **
Abbreviations
ch : chain
sl st : slip stitch
sc : single crochet
hdc : half double crochet
dc : double crochet
tr : treble crochet
inc : increase
picot2 : a picot of 2 chain: here it will be a chain 2 then sl st in the treble stitch
BLO : back loops only
R : rounds / rows

Crochet Boombox Bag Pattern
We will start by making the bottom part of the bag. In order to do it, take your 6 mm hook and the honey velvet yarn. Note that every rounds ends with a sl st in the 1st stitch of the round.
Ch 21, then starting from the 2nd loop from the hook:
Round 1: 19 sc, (4 sc in the last stitch), continu working on the other side of the chain base, 18 sc, (3 sc in the 1st stitch where we started our round). (44)
Round 2: (3 sc in the 1st stitch), 18 sc, (3 sc in the next stitch), 2 sc, (3 sc in the next stitch), 18 sc, (3 sc in the next stitch), 2 sc (52)
R3: 1 sc, (3 sc in the 1st stitch), 20 sc, (3 sc in the next stitch), 4 sc, (3 sc in the next stitch), 20 sc, (3 sc in the next stitch), 3 sc (60)
R4: 2 sc, (3 sc in the 1st stitch), 22 sc, (3 sc in the next stitch), 6 sc, (3 sc in the next stitch), 22 sc, (3 sc in the next stitch), 4 sc (68)
R5: 3 sc, (3 sc in the 1st stitch), 24 sc, (3 sc in the next stitch), 8 sc, (3 sc in the next stitch), 24 sc, (3 sc in the next stitch), 5 sc (76)
You should get a rectangle with these dimensions: 25 cm wide for 10,5 cm length. Cut yarn and finish with an invisible join. Weave in the ends.

To make the front, back, and sides of the bag, we must divide the rectangle in 4 parts. The front and back of the bag should have a total of 28 stitches (each) while the sides will count 12 stitches each.

The Front and Back
Take your purple yarn and keep the 6 mm crochet hook. Join your yarn, with a BLO sc, in the middle stitch of the 3 corner stitches on one of the larger part of the rectangle (as shown in the picture above).
I have used the BLO alternative method to make the 1st rows of the front, back and sides. This method is explained and shown in my Cactus Cat Amigurumi tutorial available on youtube. (starting 7:34)
Note that each row ends with a ch 1 then turn for the next row.
Round 1: 28 BLO (alternative) sc (28)

Round 2 to 20: 28 sc (28)
Cut yarn and weave in the ends. Repeat the same thing for the back of the bag.

The Sides
Grab your pink velvet yarn and keep your 6 mm crochet hook. Just like the front and back, join your yarn, with a BLO sc, in the middle stitch of the 3 corner stitches on one of the side of the rectangle.

Round 1: 12 BLO (alternative) sc (12)
Round 2 to 12: 12 sc (12)
For the left side:
Round 13 to 20: 10 sc (10)
Cut yarn and weave in ends.
For the right side:
Round 13: 2 sl st, 10 sc (10)
Round 14 to 20: 10 sc (10)
Cut yarn and weave in ends.

Time to sew!
To sew the sides of the bag together and form the base, start by turning the bag inside out. This means that the wrong side of the bag should be facing outwards while the right side is tucked inside. Align the edges of the two sides that you want to sew together. Pin the edges in place to secure them temporarily. Using a needle and one of the velvet yarn thread, stitch along the pinned edges. This process ensures that the seam is hidden inside the bag, giving it a neat finish. Weave in all ends when done.


Create the inside of the bag with the Plastic Canvas
To line the inside of the bag with plastic canvas, follow these steps for added stability and structure. First, measure and cut the plastic canvas to match the dimensions of the bag’s interior. It should be slightly smaller to allow for easy insertion. Next, position the plastic canvas pieces within the bag, ensuring they cover the bottom and sides completely. Additionally, you may want to trim any excess canvas that extends beyond the edges of the bag. Take the canvas out, then assemble them together with the help of a piece of yarn and a sewing needle, stitching around the edges together to form a box. Once your box is done, place it inside the bag and sew it in. This step will create a firm foundation and prevent the bag from sagging or losing its shape over time.


The Sunflowers radio speakers
Grab your pink worsted acrylic yarn and the 4,5 mm crochet hook.
Make a magic circle.
Round 1: 10 puff stitches of 4 y/o each, ch 1 then sl st in the 1st apparent stitch of the round (10)
Round 2: change color to the yellow yarn: [(ch 3, 2 dc, 1 tr, picot2, 2 dc, ch 3, sl st) in the same stitch starting the 1st stitch of the round, skip a stitch, sl st in the next one] repeat this all around. You should get a total of 10 petals.
Cut yarn and weave in the ends. Arrange the petals in a way that one should be at the front, while the next one is in the back, and so on. (you then have 5 petals in the front, 5 in the back)
Make 2 sunflowers this way.

The different radio’s dials
We will make 3 different rectangles with the white cream acrylic yarn and a 4,5 mm crochert hook.
Rectangle 1
Ch 36 then starting from the 2nd loop from the hook:
Row 1 to 4: 35 sc (35)
Cut the yarn and leave a tail for sewing.
Take your pearl cotton and a 3 mm crochet hook, then on the right side and in between row 3 and 4, then after between 4 and 5, sl st 2 lines to make the FM/AM bands. It should not take the whole length of the rectangle, make it smaller to leave a place for the heart shaped button.


Pick your pink acrylic yarn and a 2,5 mm hook, and make a magic circle.
Round 1: ch 2, 2 dc, 2 hdc, ch 1, 2 hdc, 2 dc, ch 2, sl st in the circle then close the magic circle tightly.
Sew this cute little heart on the left of the rectangle. Sew the rectangle on the top part of the bag’s front.

Rectangle 2
Ch 13 then starting from the 2nd loop from the hook:
Row 1 to 14: 12 sc (12)
Cut the yarn and leave a tail for sewing.
Rectangle 3
Ch 13 then starting from the 2nd loop from the hook:
Row 1 to 4: 12 sc (12)
Cut the yarn and leave a tail for sewing.

The frame
Grab your purple dk cotton yarn and the 4,5 mm crochet hook.
Ch 28 then sl st in the 1st loop to make a ring. Ch 1 then starting this same loop:
Round 1: 4 sc, (3 sc in the next loop), 4 sc, (3 sc in the next loop), 8 sc, (3 sc in the next loop), 4 sc, (3 sc in the next loop), 4 sc (36)
Cut yarn, make an invisible join and leave a tail for sewing.

Cut on one of the felt fabric a rectangle slightly smaller than the frame, and on the other color, cut 2 same rounds. Sew the rounds on the rectangle in a way that looks like the rounds in a mixtape (see 2nd picture below). Glue this on the rectangle 2, then sew the frame above.


The 3 bottom buttons
With one of your cotton yarn and a 3 mm hook, make a magic circle.
Round 1: 4 sc (4)
Round 2: (3 sc in a stitch) x 4 (12)
R3: 12 BLO sc (12)
Cut yarn and leave a tail for sewing. Make 3 buttons of different colors. Fill the inside of the button, I personally used some strand of yarn to fill inside, then sew them on the rectangle 3.


Time to sew! – Crochet Boombox Bag
Sew every parts of the boombox’s front, onto the bag as shown in the picture below.

The Lining
To sew a lining inside the bag, the dimensions of the fabric you’ll need to cut will depend on the size of your specific bag. To determine the dimensions, measure the interior of your bag, taking into account its length, width, and depth. Add a seam allowance of around 1 cm to each measurement to accommodate for sewing. Using these measurements as a guide, cut two same pieces of lining fabric, one for the front and back, another 2 same pieces for the sides and one for the bottom. Sew them together, then sew the lining to the bag.


Make the top of the bag! – Crochet Boombox Bag
Take back your honey velvet yarn and the 6 mm crochet hook.
Ch 27 and from the 2nd loop from the hook:
Row 1 to 10: 26 sc (26)
Cut yarn and leave a long tail for sewing.
Cut a smaller piece of plastic canva, then sew it on the bottom of this. This will help keep the boombox’s handle standing straight.

The Handle
Pick your pink or purple velvet yarn and the 6 mm hook, then ch 17.
Starting from the 2nd loop from the hook:
Row 1: sc inc, 14 sc , sc inc (18)
Row 2 to 3: 18 sc (18)
R4 to 8: 3 sc (3)
Cut the yarn, then join the yarn back to row 3 on the opposite side with a sc then repeat row 4 to 8 there too:


Make two pieces this same way. I made one purple and one pink.

Cut into your plastic canva a piece in the same shape as the handle but a little bit smaller. Insert it in between the two yarn pieces, then sew them together. You can add polyester fiberfill inside if you wish.


Time to sew! – Crochet Boombox Bag
Sew:
- The handle to the top (center it)
- The top to the bag, insert the top and sew the edges together. The front side of the top is left untouched because this is where the zipper will be sewn.
- the zipper to the space we left for it.


The straps for the chain – Crochet Boombox Bag
Pick your pink velvet yarn and the 6 mm hook, then ch 4.
Starting from the 2nd loop from the hook:
Row 1 to 5: 3 sc (3)
Cut the yarn and leave a tail for sewing. Insert the D-ring inside, fold the piece in two and sew the top and bottom together to close it around the D-ring. Make 2 of them then sew the straps on each side of the bag. Add your chain and you’re finally done!


If you managed to finish this pattern I want to congratulate you, you did a wonderful job and you can be proud of yourself. Your greatest reward is now your brand new super cute retro Boombox bag, and what a marvelous reward!

As we wrap up this delightful journey into the world of nostalgia, I invite you to stay connected with me on my social media channels.
Follow me on Instagram, Facebook, and Tiktok to discover even more captivating crochet patterns. I love seeing your unique interpretations of my designs, so don’t forget to tag me if you share your any of your project online!
I can’t wait to see your incredible creations!































What is width and length of the finished product (not including the handles)?
Hello Nakyra,
So sorry for the late reply, the dimensions are: 23 cm width, 16 length and 11 cm depth. Hope this helps 🙂