
Today, let’s make something to “cutify” our desk and workspace. For months, I had this little idea sitting in the back of my mind: a crochet memo pad holder. My desk always seems to collect memo pads, loose notes, tiny reminders, and random scraps of paper: very productive, very creative, but also very much a mess. So I decided it was finally time to make something both practical and cute to keep everything a little more organized. And of course, because a simple memo pad stand clearly wasn’t enough, I had to turn it into something sweet and playful. Introducing my latest creation: the Crochet Strawberry Cat Memo Pad Holder. So grab your yarn and hook, and let’s crochet this adorable little stand together.

Materials Needed
Abbreviations
ch: chain
sl st: slip stitch
sc: single crochet
hdc: half double crochet
dc: double crochet
inc: increase
dec: invisible decrease
Notes – Crochet Memo Pad Holder
The gauge for the yarn is: 5 x 5 cm = 9 stitches x 9 rows (single crochet)
Please note that the decreases should be made with an invisible decrease each time.
Need help keeping track of your rows?
Try Froggit, my free crochet row counter you can use directly in your browser. It helps you track your rows, rounds, and project time while you crochet or knit; no download or account needed.
Try the Free Crochet Row CounterStrawberry Cat Memo Pad Holder
Bottom
We will start by making the bottom part of the crochet memo pad holder by making a square.
Make a magic circle (don’t join the rounds at the end with a sl st, we will work amigurumi style at the beginning).
Round 1 : 4 sc (4)
Round 2 : (3 sc in the same stitch) x 4 (12)
R3 : 1 sc, (3 sc in the next stitch), {2 sc, (3 sc in the next stitch)} x3, 1 sc (20)
R4 : 2 sc, (3 sc in the next stitch), {4 sc, (3 sc in the next stitch)} x3, 2 sc (28)
R5 : 3 sc, (3 sc in the next stitch), {6 sc, (3 sc in the next stitch)} x3, 3 sc (36)
R6 : 4 sc, (3 sc in the next stitch), {8 sc, (3 sc in the next stitch)} x3, 4 sc (44)
R7 : 5 sc, (3 sc in the next stitch), {10 sc, (3 sc in the next stitch)} x3, 5 sc (52)
R8 : 6 sc, (3 sc in the next stitch), {12 sc, (3 sc in the next stitch)} x3, 6 sc (60)
R9 : 7 sc, (3 sc in the next stitch), {14 sc, (3 sc in the next stitch)} x3, 7 sc (68)
R10 : 8 sc, (3 sc in the next stitch), {16 sc, (3 sc in the next stitch)} x3, 8 sc (76)
Starting from here, close rounds with a sl st.
R11 : 4 dc, 3 hdc, sc dec x 3, 1 sc, 4 hdc, 7 dc, 1 hdc, sc dec x 3, 2 hdc, 1 dc, dc inc, 2 dc, dc inc, 2 dc, dc inc, 1 dc, 2 hdc, sc dec x 3, 1 hdc, 7 dc, 4 hdc, 1 sc, sc dec x 3, 3 hdc, 3 dc. (67)
R12 : 3 dc, 3 hdc, 7 sc, 3 hdc, dc inc, 1 dc, dc inc x 2, 2 dc, dc inc, 1 dc, dc inc, 1 dc, dc inc, 2 dc, hdc inc, 8 hdc, hdc inc, 2 dc, dc inc, 1 dc, dc inc, 1 dc, dc inc, 2 dc, dc inc x 2, 1 dc, dc inc, 3 hdc, 7 sc, 4 hdc, 1 sc. (81)
Cut yarn and make an invisible join to finish.
Top
Start by making a chainless foundation of 68 sc. Then join the 1st and last stitch with a slip stitch.
Next, you will just have to repeat round 10 to 12 of the bottom part. Finish it the same way, too.
The ears
Make a magic circle. Finish each round with a ch 1 then turn.
Row 1 : 5 sc (5) close the ring tight
Row 2 : sc inc, 1 sc, sc inc, 1 sc, sc inc (8)
R3 : sc inc, 2 sc, sc inc x 2, 2 sc, sc inc (12)
R4 : sc inc, 2 sc, sc inc, 1 sc, sc inc x 2, 1 sc, sc inc, 2 sc, sc inc. (18)
R5 : sc inc, 2 sc, sc inc, 1 sc, sc inc, 1 sc, 1 hdc, 2 dc, 1 hdc, 1 sc, sc inc, 1 sc, sc inc, 2 sc, sc inc (24)
Cut yarn and weave the ends. Make 2 of them.
The inside of the ears
Pink your pink yarn and the 3 mm crochet hook.
Make a magic circle. Finish each round with a ch 1 then turn.
Row 1 : 5 sc (5) close the ring tight
Row 2 : sc inc, 1 sc, sc inc, 1 sc, sc inc (8)
R3 : sc inc, 2 sc, sc inc x 2, 2 sc, sc inc (12)
Cut yarn and weave the ends. Make 2 of them.
Sew the 2 of them in each of the ears we previously made.
How to sew each part – Strawberry Cat Memo Pad Holder
Sew the top part on the bottom starting by “drawing” the square part on the center first. In order to do so, let the stitches of row 9 on both part correspond with each other. Sew them together.

Once you’re done, slide the ears between the top and bottom parts. Sew everything together, by sewing the edges together.


The Tail
Make a magic circle. (don’t join the rounds at the end with a sl st, we will work amigurumi style at the beginning)
Round 1 : 4 sc (4)
Round 2 : sc inc x 4 (8)
R3 to 4 : 8 sc (8)
Fill the tip of the tail with the polyester fiber.
R5 : 2 sc, sc dec, 2 sc, sc dec (6)
R6 to 25 : 6 sc (6)
Cut yarn and fasten off. Insert the wire inside the tail up to the tip of it. Leave a piece of wire out of the tail to insert into the memo pad holder base. (between the top and bottom parts) Then sew the tail on the side, making sure it is firm and sturdy.


The leaves
Pick your green yarn and the 3 mm crochet hook, and make a magic circle.
Row 1 : 4 sc (4) close the ring tight
Row 2 : ch 6, starting the 2nd loop from the hook: 1 sl st, 1 hdc, 2 dc, 1 sc, then sl st in the 1st sc of the row.
Ch 6, starting the 2nd loop from the hook: 1 sl st, 1 hdc, dc inc x 2, 1 hdc. Then sl st in the 2nd sc of the row.
Turn the leaf from left to right:


Ch 6, starting the 2nd loop from the hook: 1 sl st, 1 hdc, dc inc x 2, 1 hdc. Turn again from left to right to sl st in the 3rd sc of the row.


Sl st in the 4th stitch then: ch 6, starting the 2nd loop from the hook: 1 sl st, 1 hdc, 2 dc, 1 sc, then sl st back to the 3rd stitch.


Now sl st in the center of the magic circle. Then: ch 6, starting the 2nd loop from the hook: 1 sl st, 1 hdc, 2 dc, 1 sc. Then cut the yarn and make the tail go through the center of the magic circle again. Weave in ends.

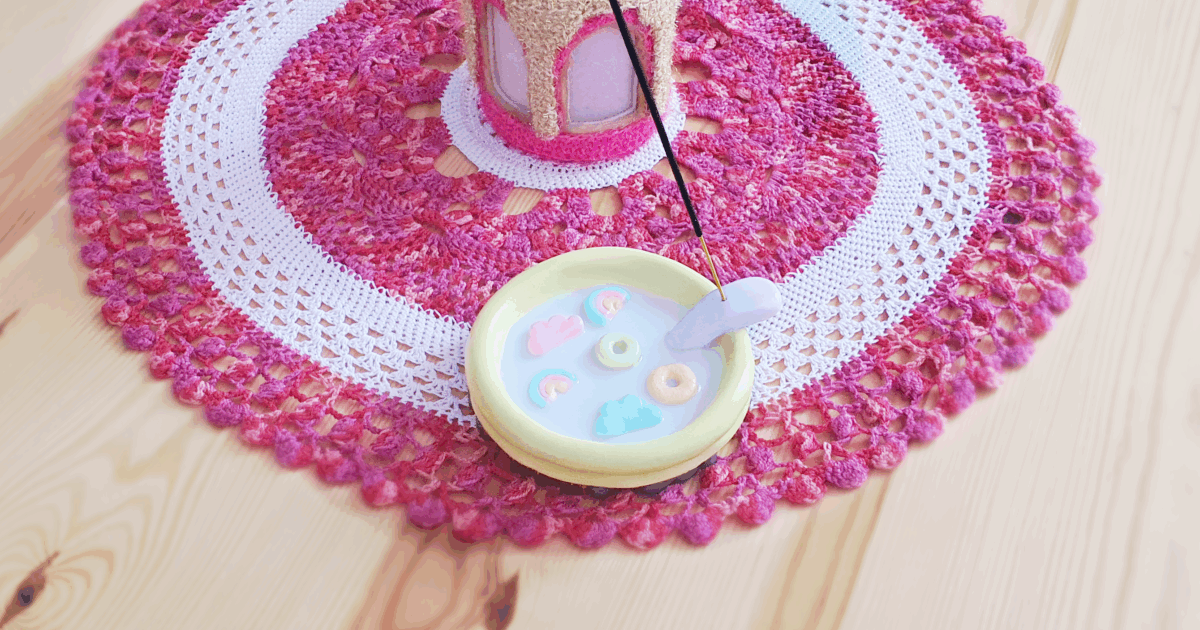
Sew the leaves on top of the cat’s head. To complete your strawberry cat: with a sewing needle, embroider pieces of white yarn on the crochet memo pad holder. Just twirl the tail to give it a shape that will hold your pencil, as shown in the picture below.

Don’t forget to comment and share if you liked my pattern, that means a lot to me! You can also follow me on my different social media (Instagram, Pinterest, Tiktok, Youtube). I will be happy to count you amongst my loyal and beloved followers. See you in the next one!


I have a question when working on the strawberry cat memo pad holder on rows 9 when it say
sc dec x 3,do you make 3 sc dec
Hello Teresa, yes it is right, you should make a sc decrease 3 times in a row ( so you will be working on a total of 6 stitches to do so). Hope this answer your question 🙂
Hi. I am struggling with row 10 (bottom) . It says at the end you will have 67 stitches. I do not, but also I end up on a Sc Dec x2. There aren’t enough stitches to complete the 3rd sc dec or the last 3 hdc or 3dc. What am I doing wrong?
Hello Letha,
You’re not the one making a mistake, I’m so sorry I just noticed I forgot a line in my pattern. Round 10 is actually another increase for the square part. I have updated the pattern, please take a look again at round 10, it should be good now. Thank you very much for bringing the mistake to my attention.
Thank you!! I love this pad holder. It’s super cute!