
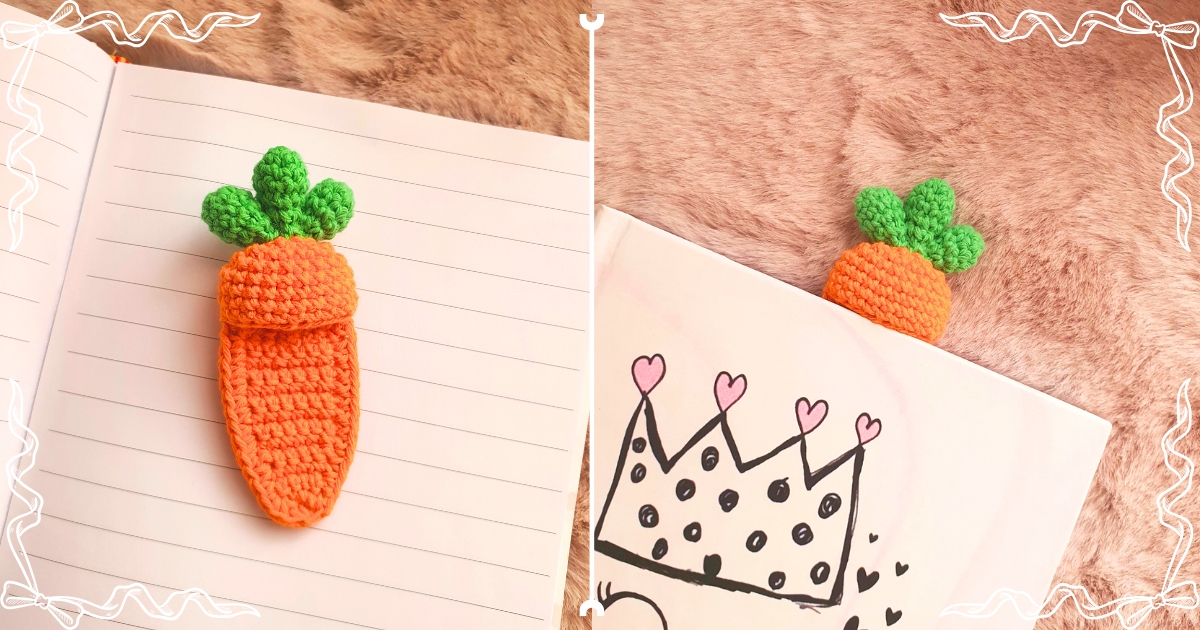
I first wrote this Carrot Bookmark Crochet Pattern years ago, and honestly, I had almost forgotten about it until I found it again while going through some of my old things. Seeing it again reminded me how much I still liked it. It’s such a funny little project: a carrot squished inside a book, with the leaves sticking out at the top, but it still makes me smile.
I originally made this crochet carrot bookmark as a paid PDF for my Ravelry and Ko-fi shops. It’s been available there for years, but it never really got the attention I thought it deserved. So instead of leaving it buried in my old patterns, I decided to share the full free crochet bookmark pattern here on the blog.
The PDF is still for sale, but you don’t need it to complete the project. The whole pattern is right here. The paid version is simply for people who would rather have everything in one clean, ad-free file that they can download, print, or keep on their device without having to come back to the website.
This cute crochet bookmark pattern is a bit different from a regular flat bookmark. You tuck the carrot between the pages and leave the leafy top poking out so your place is easy to find. So now let’s crochet it!

Materials Needed
Abbreviations
ch: chain
sc: single crochet
sl st: slip stitch
inc: increase
dec: decrease
sc3tog: a decrease of 3 single crochet together
BLO: back loops only
R: round / row
Notes – Crochet Carrot Bookmark
The finished crochet carrot bookmark will be approximately 9 cm tall, 4 cm wide.
The gauge for the dk yarn is: 5 x 5 cm = 9 sc x 10 rows.
Make sure to mark your first stitch at the beginning of every rounds.
The rounds are worked in the amigurumi style, so no joining rounds at the end. Each row ends with a ch1 then turn.
Need help keeping track of your rows?
Try Froggit, my free crochet row counter you can use directly in your browser. It helps you track your rows, rounds, and project time while you crochet or knit; no download or account needed.
Try the Free Crochet Row CounterCarrot Bookmark Crochet Pattern
The Top of the Carrot
Grab your orange yarn and your hook, then chain 8.
Round 1: 6 sc, (3 sc in the last loop), continue working on the other side of the chain: 5 sc, (2 sc in the last stitch which is where we made our 1st sc) (16)
Round 2: (sc inc), 5 sc, (sc inc) x3, 5 sc, (sc inc) x2 (22)
R3: 22 sc BLO (22)
R4 to 6: 22 sc (22)
R7: 9 sc, (sc dec), 9 sc, (sc dec) (20)
R8: (sc dec), 5 sc, (sc dec), 1 sc, (sc dec), 5 sc, (sc dec), 1 sc (16)
Fill it with some polyester fiberfill then move on to the next round:
R9: (sc dec) x 8 (8)
Cut the yarn, then close the hole with the help of a yarn needle. Weave in all ends.


The Bottom of the Crochet Carrot Bookmark
We’ll be working this one in rows, so every row ends with a ch1 then turn.
Chain 8, starting from the 2nd loop from the hook:
Row 1: 7 sc (7)
Row 2 to 9: 7 sc (7)
Row 10: (sc dec), 3 sc, (sc dec) (5)
Row 11 to 12: 5 sc (5)
Row 13: (sc dec), 1 sc, (sc dec) (3)
Cut the yarn, fasten off and weave in all ends.
Now join back the yarn to one of the side, at the top, with a sc.
Single crochet around the edge of the carrot bookmark crochet pattern, working the jewelry wire into the stitches as you go. This will give the base a firm, sturdy border, as shown in the photo below.

Here’s how to crochet the edge: work 11 sc along the first side, make a sc inc in the stitch just before the 3 bottom stitches, then work a sc3tog across those 3 stitches.


Then on the other side make one sc increase, and finish with 11 sc just like the other side. Cut the yarn and leave a tail for sewing.
Cut the wire at both ends, leaving a short tail on each side so you can tuck them inside the top when sewing the pieces together.

To attach the bottom, center it carefully beneath the top of the carrot. Tuck the wire ends inside the top for extra support, then sew both pieces together as shown in the photo below.

The Leaves – Free Crochet Bookmark Pattern
Time to grab your green yarn, and make a magic circle. Still working in the amigurumi technique for this one too.
Round 1: 6 sc (6)
Round 2: (1 sc, sc inc) x 3 (9)
R3 to 4: 9 sc (9)
R5: (1 sc, sc inc) x 3 (6)
For 2 of them you will end the rounds here, and cut the yarn. For the 3rd one we will add another round:
R6: 6 sc (6)
Cut the yarn, fasten off and lightly stuff all three leaves with polyester fiberfill. Arrange them with the two shorter leaves on the sides and the longer leaf in the center, then sew them together before attaching the cluster to the top of the carrot.

And, voilà!
Your little carrot bookmark is ready to disappear between the pages and leave only its leafy top peeking out. I love projects like this because you can finish one in about an hour, use up some leftover yarn, enjoy making it, and still end up with something really cute.
You could also play around with the colors and make a whole bunch of them. Classic orange, pastel pink, yellow, purple… honestly, carrots do not need to respect reality here.
As you have noticed, this is a really quick and easy project to make. It can be an adorable and cute gift for your family and friends. So spread the love for carrots around you and make people smile with this super kawaii design!
If you enjoyed making this little carrot, you can find more free crochet patterns and crafty projects here on the site. You can also follow me on social media (Instagram, Tiktok, Pinterest and Youtube) to see what I’m working on, share your finished bookmark, or just come hang out for more yarn, DIY, and slightly unnecessary cute things.


































0