
Paint by numbers has become a favorite hobby for my mom and me. It’s our little moment of the day when we sit together in my studio and paint kits we buy online. Lately, though, I’ve been eager to take it a step further, I wanted to create my own kits so I could paint designs that truly reflect my personal style and customize the artwork I display in my home.
Let’s face it, the options available online can feel a bit limited and repetitive, and they don’t always resonate with my aesthetic. After months of searching, I finally stumbled upon a website that makes it incredibly easy to create authentic paint-by-numbers projects. And the best part? It’s completely free! If the idea of creating your own paint by numbers kit, whether for adults or kids, sounds exciting, keep reading to find out more!

What You Will Need
To create and complete your custom paint by numbers kit, gather the following materials:

DIY Paint By Numbers Kit
Step 1: Choose Your Image
Start by selecting an image you want to turn into a paint by numbers design. It could be a favorite landscape, a piece of art, a vacation photo, or even an illustration you’ve created yourself. Remember, the clearer the image, the better the outcome. Steer clear of blurry or low-quality pictures, as they can compromise the final result.
Step 2: Upload Your Picture on The Website
Now that you’ve picked your image, head over to DigitPaints and upload it by clicking the “Generate” button.

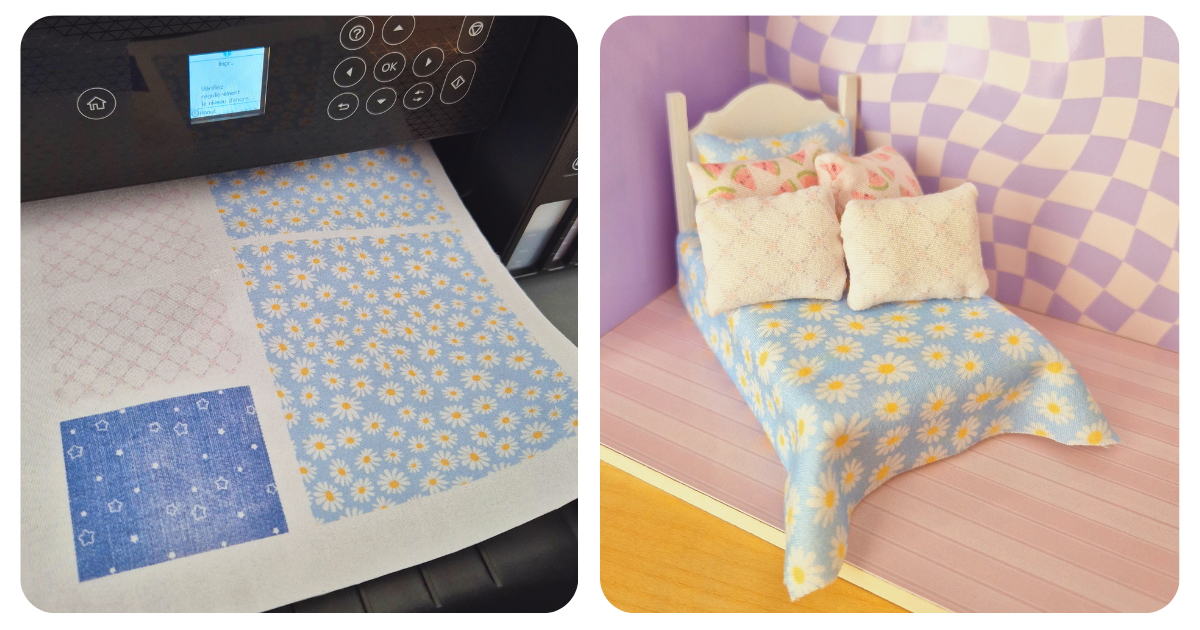
Next, you’ll be taken to a new page where you can select the size of your painting. Options include standard sizes like A2, A3, A4, or A5, or you can even create a custom size to suit your needs. If you’re planning to print on cardstock, A4 is a great choice. And if you have a cutting machine, you can tailor the size to your preference, then use the tracing pen tool to transfer the design onto your paper or canvas with precision.

Click the upload button below the size dropdown menu and select your image from your files.
A new window will appear, allowing you to crop your design to the size you selected. Adjust the crop as desired, then click the “Done” button.

After a short processing time, your design will be ready. Once it’s prepared, you can adjust the level of detail (difficulty), the higher the detail, the more intricate the design will be, while lower detail simplifies the design, making it easier to paint.
You can also modify the number of colors: increasing the colors will add more detail to your painting, while reducing the colors will result in a simpler design. Customize these settings to suit your preferences. Once you’re satisfied, all that’s left is to download your design! You’ll receive a PDF file with two pages: the first page displays the design with numbered sections, and the second page shows the corresponding colors, helping you prepare your paints.

Step 3: Print Your Image
To print your paint by numbers image after downloading the PDF file, here are three options you can use:
With A Printer
The size you can print depends on your printer’s capabilities. Most standard home printers can print on paper sizes ranging from A5 to A4. If your printer supports A3, you’ll be able to print on that larger size as well.
If your printer doesn’t support large formats but you need to print a design bigger than A4, such as for a 40 × 50 cm canvas frame, you can split the design into smaller sections. Print each section on separate A4 sheets, then assemble them like a puzzle once all pieces are printed.
To transfer the design onto the canvas, you can use a simple graphite transfer method. Rub pencil lead on the back of the printed sheets, place them on the canvas, and trace over the design with a pencil. This will transfer the outline onto the surface, making it easier to paint or work on.
With A Cutting Machine Or Laser Engraver
To trace a design using a cutting machine or laser engraver, you first need to convert it into a vector file. Vector files, like SVG (Scalable Vector Graphics), allow machines to recognize and follow clean, precise paths for cutting or engraving.
If you’re using Silhouette Studio, you’ll need a paid license (such as the Designer Edition) to export files as SVG. For Cricut, check if it supports direct vector conversion or if you need to prepare the file separately.
Alternatively, you can use vector software like Adobe Illustrator or Inkscape to convert your design into a vector format. Use the Image Trace feature (in Illustrator) or the Path Trace tool (in Inkscape) to refine your design and create smooth, clean vector lines. Once your design looks good, save it as an SVG file.
Next, open the SVG file in your cutting machine or laser engraver’s software. If you’re using a cutting machine, you can trace the design with a pen tool to draw it on your paper / canva. If you’re using a laser engraver, you can engrave the design directly onto your material.

Step 4: Prepare your paints
To prepare your acrylic paints for your paint by numbers project, start by dispensing small amounts of each required color into individual cups or palette wells. Use the color reference palette from your printed design and mix the paints gradually, adding small amounts of one color to another until you achieve the right shade. A palette knife or a brush works well for blending.
If the paints seem too thick, you can thin them by adding a few drops of water or an airbrush thinner to reach a smooth, workable consistency. Once your color is ready poor the paint into a little cup to keep it from drying when you’re not painting. I personally ended up using some leftover paints from several paint by numbers kits I had completed earlier.
Be sure to label each cup with its corresponding number from your design to make the painting process enjoyable and stress-free. If you’ve created custom shades, jot down the mixing ratios so you can easily recreate them later.

Step 5: Relax, Paint and Enjoy!
Now comes the fun part: set up your workspace, get comfortable, and let the painting begin! To keep things neat, lay down some protective covering if needed, grab your brushes, and enjoy the relaxing process of bringing your design to life. Take your time, follow the numbers, and most importantly, have fun with it!

Once your painting is complete, you can seal it with a coat of varnish to protect the colors and give it a pretty finish. Framing your artwork will not only keep it safe from dust but also turn it into a beautiful display piece for your home.
With this DIY approach, you now have a fun and creative way to make your own custom paint by numbers kits! Make one for yourself to relax, or design one for your kids as a fun, screen-free activity. It’s a great way to keep them entertained without relying on TVs or tablets. You can even make it a family moment, while your little ones paint their own designs, you can work on your own adult version alongside them. It’s a perfect mix of creativity, relaxation, and quality time together!
If you enjoyed this article, feel free to leave a comment below, I’d love to hear your thoughts! Let me know if you’re thinking of giving it a try. And if you found it helpful, don’t hesitate to share it with your friends so they can discover this fun and easy way to create their own DIY paint-by-numbers kit at home. Also, feel free to explore my website for more creative crafts and fun DIY ideas to try!
Until next time, follow me on social media, and I’ll see you in the next one!
You might also enjoy these articles:
📌 DIY : How To Make Your Own Frame For Punch Needle
📌 DIY: How to make a cute needle minder
📌 DIY SpongeBob SquarePants Flower Coaster With Air Dry Clay


0